
I enjoyed my painting time this morning, even though I wasn’t able to successfully complete the scene I set out to do. The inspiration came from a book I found at Amazon: Creating Your Own Masterpieces in Oil by T. Stonefield. The author takes a slow, patient approach, and I enjoyed the leisurely pace.
A large part of Stonefield’s teaching method involves value, understanding how to create depth and distance in a landscape by using the proper tints and shades of various colors.
Although this painting might look like others I’ve done, there were many things different about this one. Instead of my familiar canvas panels, I used a stretched canvas for this one. Instead of composing the scene “on-the-fly” at the easel, this one was sketched out in advance.
Previously I tried sketching a scene on canvas, and it didn’t work for me. I’d used graphite the first time. Stonefield taught me to use ink. The results were much better.
After sketching out the basic features of the landscape, I used a thin mix of raw umber for an underpainting. I love the way it shows through to give a touch of warmth to the skies.
The colors I used for the painting were raw umber, titanium white, cerulean blue, cadmium red, cadmium yellow, and Indian yellow.
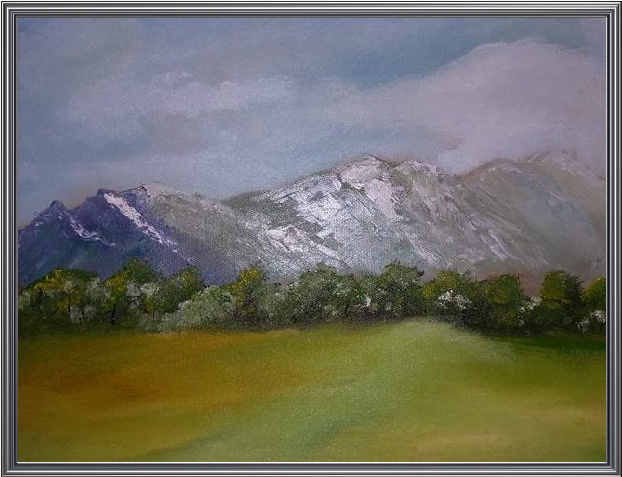
The scene was supposed to have a river running through it, and I’m sure you can see where I tried to paint the water. I couldn’t get the river right with my initial sketch, changed it, couldn’t get it right when I tried painting it, changed it, tried it again, and still just couldn’t get the river running through this scene.
I decided that even though the scene might look a bit incomplete without the water, it looks better than it would with an ill-painted river meandering around the foreground. I will keep working on rivers. Maybe the next one will be better, good enough to include in a painting.
As it is, I like a lot about the painting, and I very much enjoyed the process of planning the scene, sketching it out and giving careful thought to the values. I especially enjoyed mixing the colors from the palette I chose.
I’m happy. It was a good day at the easel. I like what I created.

Beautiful! Really love your description of your process!
LikeLiked by 1 person
Thank you so much. The encouragement I get from the artists I meet inspires me and keeps me going. This has been an incredible journey for me, and I look forward to learning more and improving my abilities. I’m grateful to you for visiting and commenting on my efforts.
LikeLike
Do you work on your paintings in a single session or over the course of several?
LikeLiked by 1 person
A little of both. Mostly a single session, but others I’m doing over different sessions. I like having something to show for my time each day, but I also like the slower pace, too.
LikeLike
I find that one has to work out those issues – such as the river. It may be there in real life and look wonderful in real life, but, if it doesn’t work in your painting – leave it out. Your sky and mountains are lovely. Looking at it from my perspective, you may need some more focused detail in the foreground. Other than that it looks almost done.
Leslie
LikeLiked by 1 person
Thanks, Leslie. I do fairly well with skies and things in the distance. It’s the middle ground and the foreground that give me fits, especially the foreground. I need a lot more practice 🙂
LikeLiked by 1 person
You’re going to figure this out. You just have to trust your own judgement. With art there is no right or wrong.
Leslie
LikeLiked by 1 person
I enjoy trying different things. Of course, they don’t always work out 🙂 So I just keep trying. Yes, in time, I hope I will figure out what works best for me. I’ve recently discovered my “favorite” brush — a Royal Langernickel “mop” brush. It’s all a learning process. I appreciate your encouragement.
LikeLiked by 1 person
The biggest surprise to me, Judith, was that even the greatest artists struggled with their paintings.
Leslie
LikeLiked by 1 person
That’s reassuring to hear 🙂
LikeLiked by 1 person
So the “greats” struggled too.
Leslie
LikeLiked by 1 person
Another beauty – and I honestly wouldn’t have noticed the river cover up if you hadn’t mentioned! 🙂
LikeLiked by 1 person
Thank you, Jodi. I’ve always had trouble working in the foreground. It was the same with watercolor…so I’ll just keep practicing until I figure out what to do. 🙂
LikeLike
Great painting Judith. It looks like you are starting to hit your stride with oils!
LikeLiked by 1 person
Thanks. I do enjoy oil painting, but the last few days have been all downhill. That’s the way it always goes, isn’t it? Just when we think we’re improving, we suddenly can’t do anything right. That’s how it often is for me, at least. Then when I’m about to give up, I have a major breakthrough and make a leap forward. I’m hoping that my recent struggles will lead to one of those big leaps. 🙂
LikeLiked by 1 person
Keep going Judith. Your doing well!
LikeLiked by 1 person
Thanks! Got another question for you. Where do you put your paintings while they’re drying? Is there any sort of rack or anything…? And how do you store your finished paintings — other than by hanging them on the wall? Oh, that’s 2 questions. 🙂
LikeLiked by 1 person
Lolololololololol. That question is so loaded! My husband and I made me a canvas holder unit…basically a 6 foot long, 2 foot depth, a little over 2 foot high box on wheels. I can send you a picture if you want on Facebook or your email. Let me know. Anyway, that is where dry paintings go. I have three easels, the top of the canvas storage unit, a 10 foot bar and a writing desk to put them while they dry (my dining room is officially a craft room…all painting supplies and well, paintings, wet and dry go there if not on my walls. I just gave away about 15 paintings and donated 9 to an auction…you will have to get rid of some eventually. I gave away probably 20ish in September also. I only keep the ones that I think are good enough for my walls or something I would like to sell. Everything else goes. I paint probably 15 or 16 paintings a month and I do not have room for them…plus as you get better, you won’t like your beginning stuff anyway…a few will be sentimental, but not too many. Some, I throw in the trash because I can’t stand seeing something that I hate on display anywhere.
LikeLiked by 1 person
Yes, please send me a picture! Facebook is fine…you can send it in a private message if you want. I think most of my “beginner” paintings will be recycled. I have a few paintings that family members would like, and I have a few that I’m going to keep, and right now they’re all over the house! My husband was talking about trying to build something, so he’ll be very interested in your storage system. Thank you so much for all the help you’ve given me!
LikeLiked by 1 person
See, you have a plan. We made the system so that I can stack another box on top of it if I need to in the future. The one we made has wheels, which is handy…just coasters, but anything can be stacked on top. I will try to Facebook pics now.
LikeLiked by 1 person
Thank you so much for the pictures. Your studio looks great, much better — and neater — than my little corner of the kitchen 🙂
LikeLiked by 1 person
Lol. Oh no, I paint in a little corner in the kitchen…the studio is storage. I wish I had a separate studio!
LikeLike
LOL, so you know what I’m going through. My husband liked the pictures. He’s thinking we should turn the guest room into a painting storage area. Tonight we framed one of my paintings, and it’s now hanging on the wall in the bedroom. It looks really good. My husband says he wants the walls covered with my oil paintings. It’s so nice to have a fan of my work. LOL
LikeLiked by 1 person
Think that is a great idea. Good man!!!
LikeLiked by 1 person
I’m truly lucky that he’s so supportive of my art. I’m blessed.
LikeLiked by 1 person
😀
LikeLiked by 1 person
And yes, you can buy drying racks. I think bakers racks would be good too. We made the canvas holder because the ones you can buy are really expensive compared to what you can make yourself if you are into DIY projects.
LikeLiked by 1 person
My husband is very handy 🙂 Thanks.
LikeLiked by 1 person